
Sampling Preparation & Execution Best Practices For Environmental Monitoring
By Allan Marinelli, Quality Validation 360 Inc.

Due to globalization, restructuring of organizations, and the emergence of fast-paced technologies, companies need to endorse efficient and effective methods of performing validation. This is especially true when establishing a defendable environmental sampling plan (performance qualification phase), since there is a higher probability for the FDA or other regulatory agencies to scrutinize the documentation process during inspection when companies attempt to obtain licensure of their facility for the manufacture of their products.
As far as establishing a defendable environmental monitoring (EM) sampling plan within the performance qualification phase, I propose six phases to increase the likelihood of success during inspection for licensure of a facility. However, the extent of these phases is commensurate with the risk of the manufacturing process applications controlled under the relevant regulatory agencies and intended uses. I provided a generic example of the elements suggested to attain successful inspection, but some companies may need less planning while others may need more.
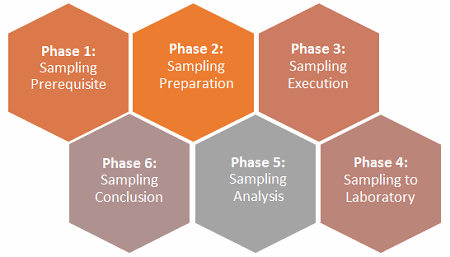
Figure 1: The six phases of an environmental monitoring (EM) sampling plan
The previous article in this three-part series discussed the three prerequisites to establishing an environmental monitoring plan. This second part will discuss the sampling preparation phase and sampling execution phase.
Phase 2: Sampling Preparation
From Phase 1: Sampling Prerequisite, the total number of samples and site locations has been determined, but there are two methods of proceeding with this phase.
- Automated method: EM samples can be handled or prepared by an automated method through laboratory computer software by entering information into a computer to create a sampling plan which includes preparing labels, collecting sample information, ensuring the chain-of-custody samples are assigned correctly, and preparing the samples for incubation.
- Manual method: EM samples can also be handled or prepared using a manual method in which the recipient uses their knowledge attained through training/SOPs and completes any relevant forms by handwritten transmission where warranted.
Recommended steps for completing this phase are as follows:
1. Organize required materials into one location.
Ensure all materials required to be brought into the facility for environmental testing such as agar plates, labels, and sampling trolley are organized in one location in a designated room. This can decrease the likelihood of contamination prior to performing the first EM session and increase the operational efficiency of the EM testing by decreasing the time of execution. Document all prerequisites on a document in alignment with the company’s quality system to ensure all required materials have been factored in prior to any execution activities.
2. Check the agar plates.
Prior to using any of the agar plates for sampling, ensure they have been stored within the manufacturer’s temperature range. Ensure the plates have not passed their expiration date prior to sampling/collecting, including the post-sampling analysis date. And, ensure the plate appears normal by confirming alignment with pictures or instructions in the vendor’s manual. For example, if there are any of the following visual attributes, do not use the agar plate for sampling: contamination, damages, unevenness or too thin layer, or condensation of water on the lid (inside).
3. Prepare the labels.
Sterilize the labels for grade A/B or C at the bottom of agar plates or another suitable location on the plates prior to inserting them. You can also put the labels on after the sample is taken, but it is more efficient to introduce the labels to the agar plate prior to sampling.
4. Sanitize the equipment/materials/instruments/sampling trolley.
Sanitize the air sampler and particle counter prior to the entrance into the EM area for sampling. Ensure the sampling trolleys are cleaned and sanitized, including the wheels and undercarriage, by using a validated sanitization detergent. Document this task appropriately in a log book or database by referring to the equipment identifier.
Learn how to establish a risk based approach to your EM program in the webinar:
Environmental Monitoring (EM) – Establishing and Improving Programs Using a Risk-based Approach
Phase 3: Sampling Execution
In this phase the samples are in a ready state, so the user is ready to commence the execution relative to the positions outlined in approved drawings, like those below.

Figure 2: Generic viable air particulate sample locations (click for larger version)
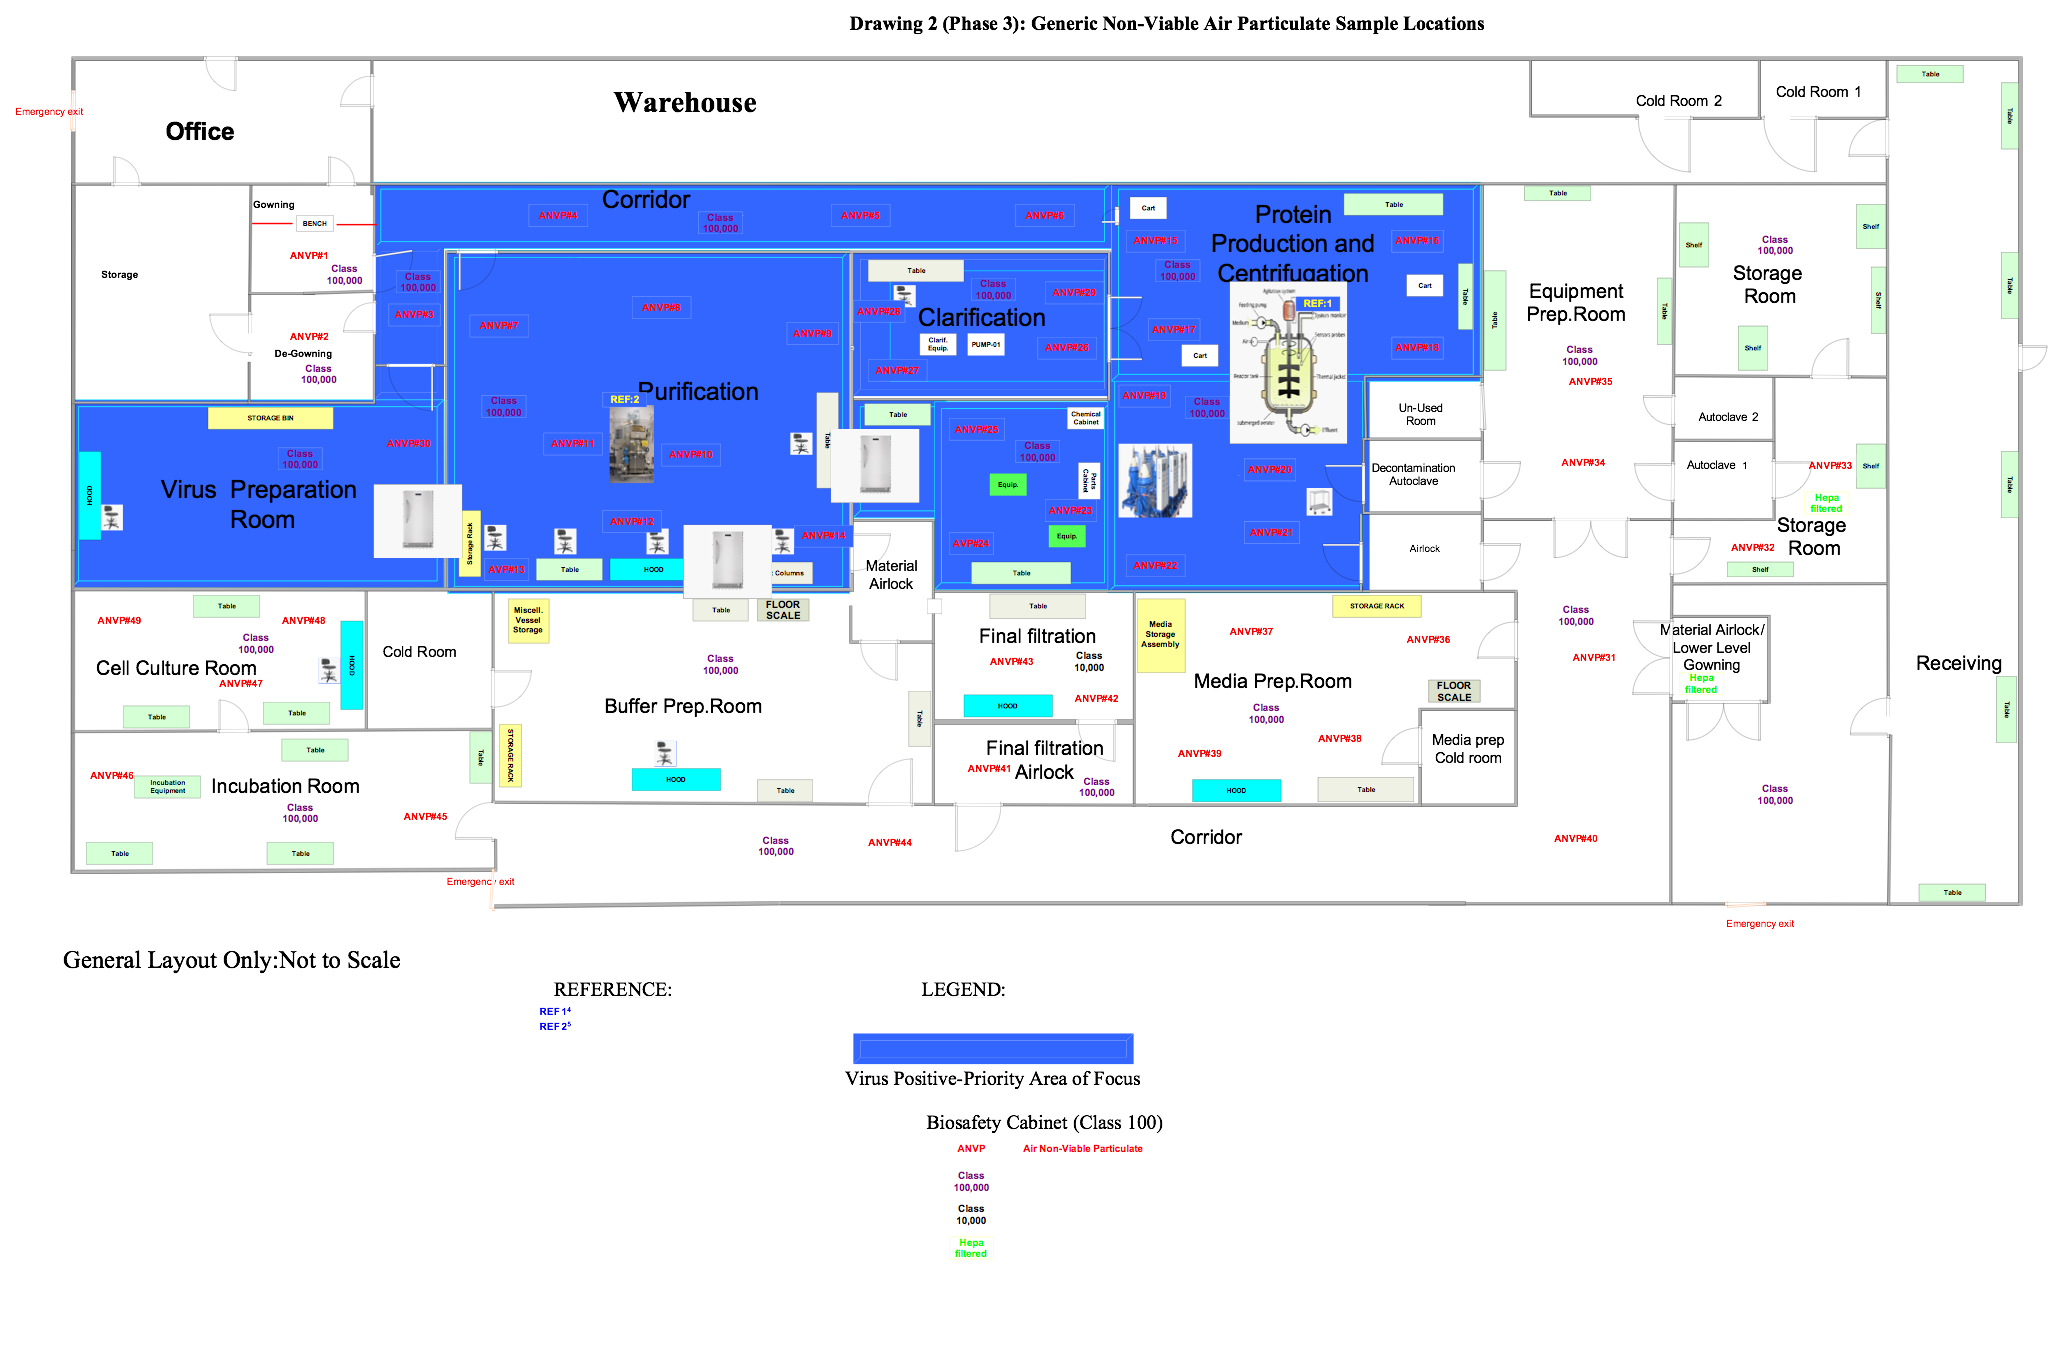
Figure 3: Generic non-viable air particulate sampling locations (click for larger version)
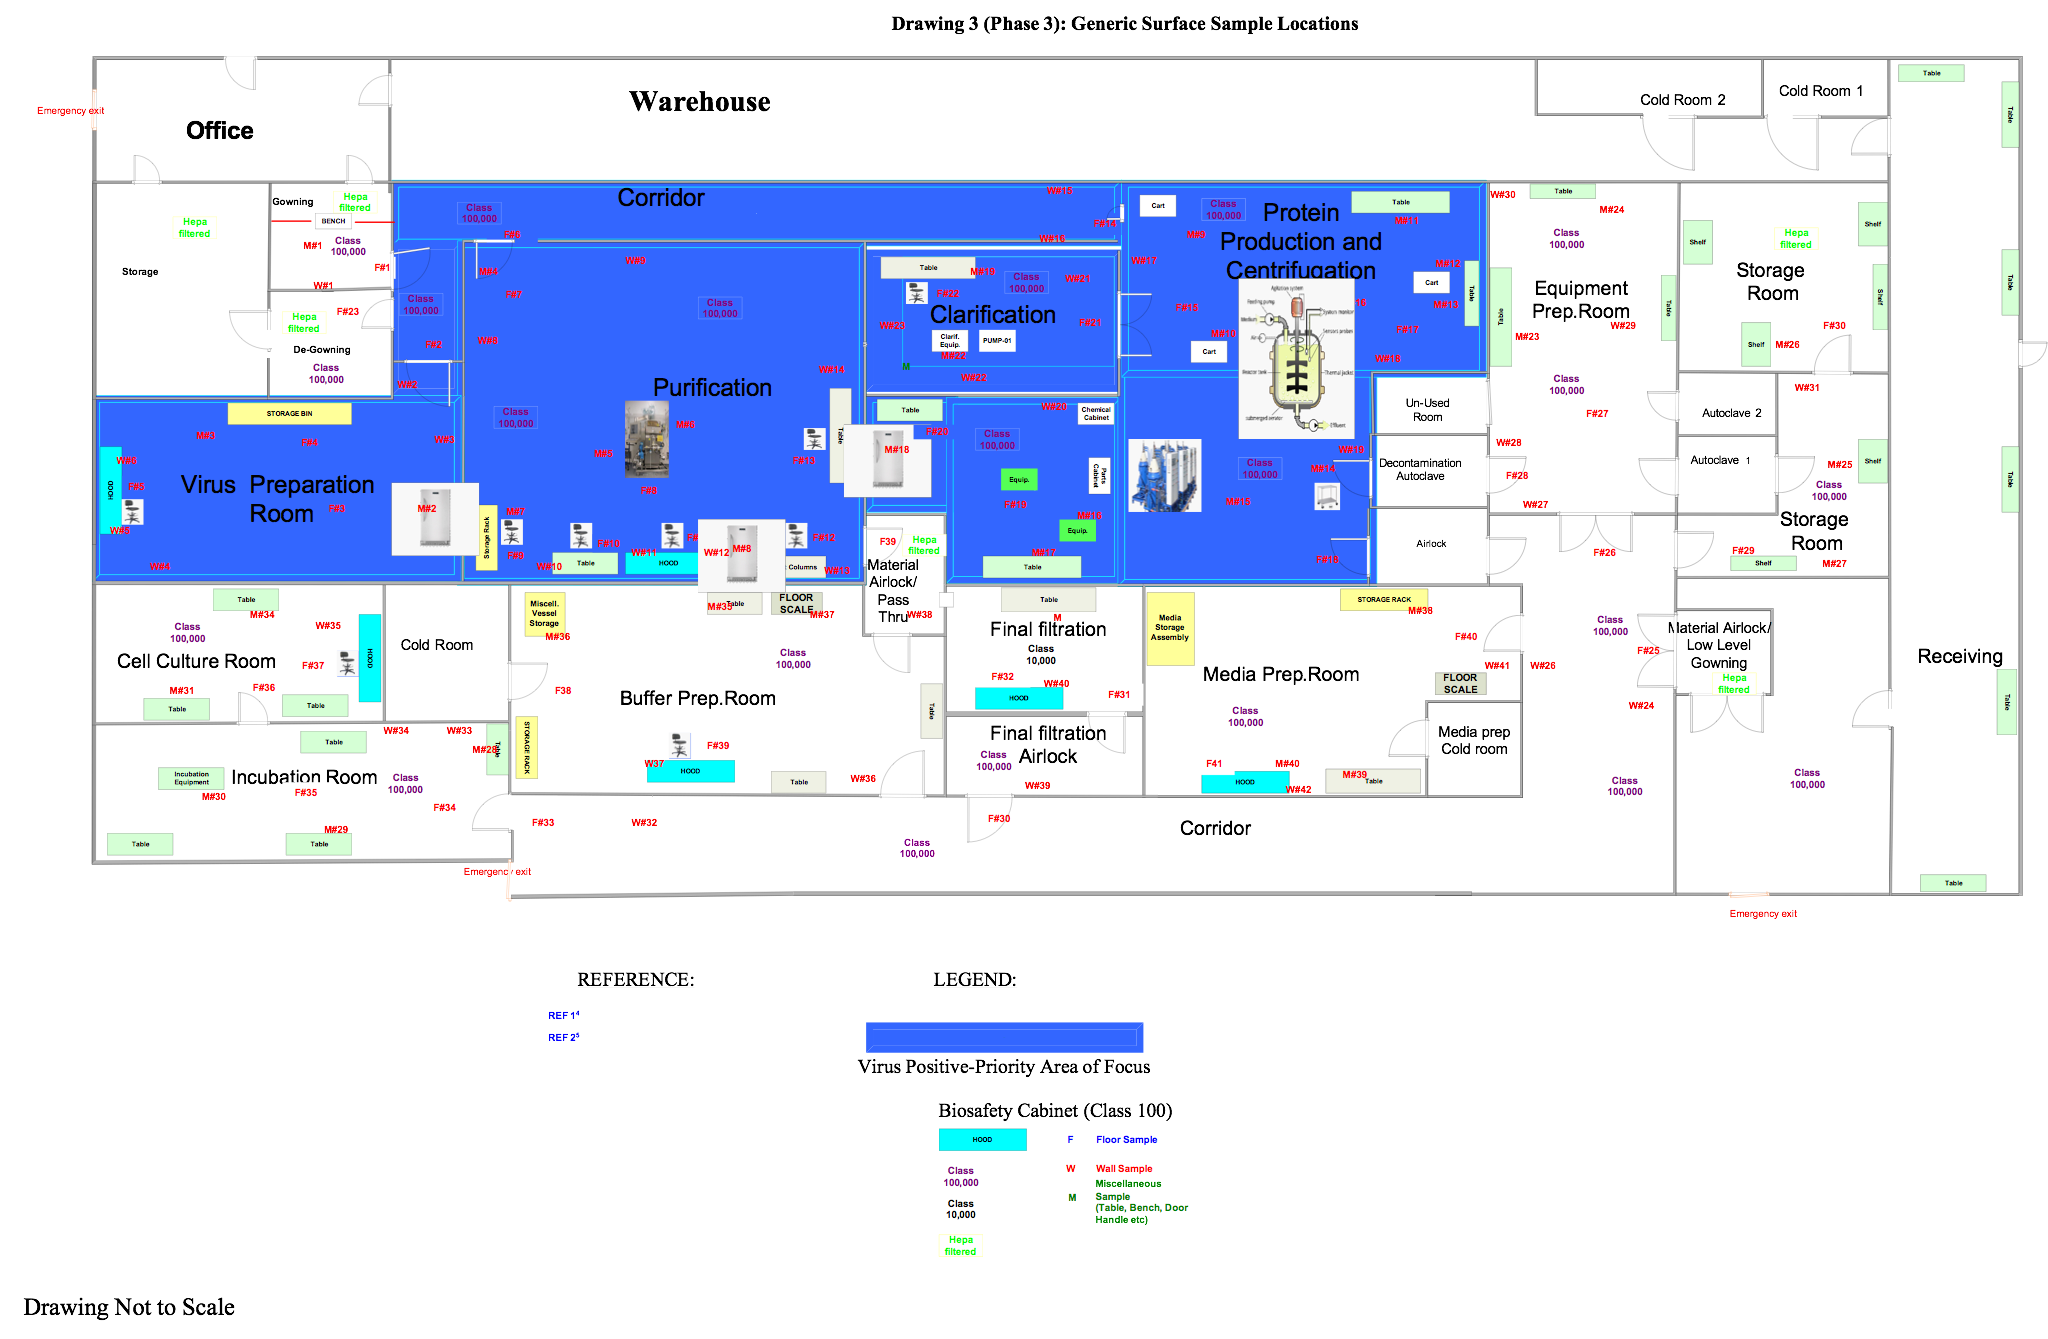
Figure 4: Generic surface sampling locations (click for larger version)
This phase can be subdivided as indicated below:
Recommended Sequence of EM Testing
Although there are many starting points (locations) for the EM sample testing or program, it is recommended to avoid or diminish cross-contamination from the tester or sampler by sampling from a higher room classification to a lower room classification. This is because even if the company’s cleaning regimen is adhered to, there is a possibility of reintroducing or transferring additional contamination by walking from the lower room classification (not cleaned to the same level as the higher room) into higher room classification during the EM session. Contaminants may create false positive results. Contamination transfer can also arise from the tester or sampler initially violating the gowning procedure or the gowning procedure being inadequate based on intended uses. The more gowning iterations during the EM session, the higher the chance of contamination.
Conditions To Factor In While Sampling
Increase the number of gloves and booties when entering from lower room classification to higher room classification (an additional one or two pairs of sterile gloves depending on how many different levels of room classifications exist at your facility). Start the EM session from the highest area classification (such as filling room or final filtration purification room). Since some of the most likely contamination transfers come from the floor and gloves (e.g., touching the door knob to open the doors from one room classification to the other), the tester or sampler should wear an additional pair of gloves and booties.
Sampling of the personnel who will conduct validation or post-validation (routine EM) should be taken in the gowning areas first after the operator has thoroughly gowned, as recommended by Figure 5.
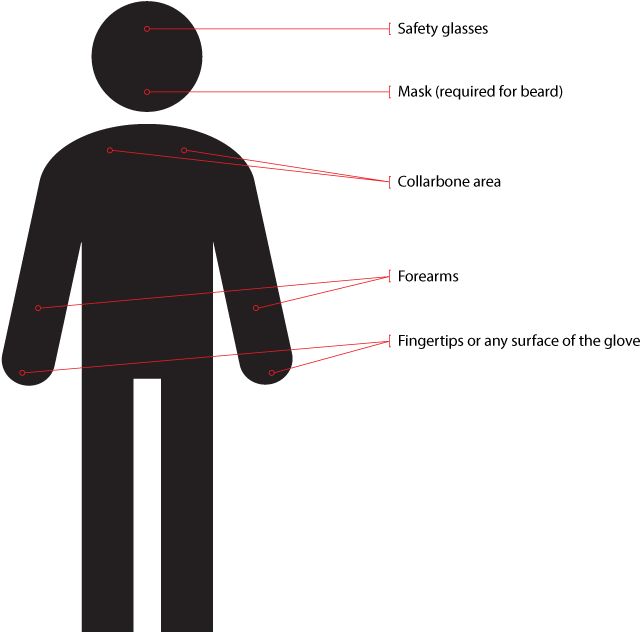
Figure 5: Where to sample personnel for validation or routine EM purposes
For grade B or C test areas, it is recommended to conduct two sets of surface EM tests, one for aerobic and the other for anaerobic. Pertaining to gown samples, the two sets of samples can be taken either at two sample locations nearby or from two separated gowns, with the assumption that the operator/sampler enters twice in grade B or C. For anaerobic EM samples, the sampling method involves the same approach as aerobic samples, except the agar plates must be incubated in anaerobic condition.
If the level of microorganisms defined after identification falls outside of the action limit, additional samples may be warranted.
Adhere to the manufacturer’s conditions for packaging of agar plates for anaerobic tests.
Confirm at the end of each day that the collected microbe samples were sent for incubation in accordance with the EM program or validation plan.
Following are some abnormal situations that may arise:
- Particle counter alarm: When a sampling result exceeds an acceptable programmed limit, take another sample at the same location. If the alarm is still generated, contact the validation manager and EM manager.
- Equipment problems: If the particle counter/air sampler malfunctions, follow the troubleshooting guide in the manual and re-sample. If the problem is still not corrected, use other equipment to sample.
- Contamination of samples: If the sampler post-contaminated the agar plate during either the sampling session or the transition state toward the sampling session (e.g., inadvertently crushing the plate through the lid in an EM transient session), discard the plate and take another sample with another agar plate.
- Air sample/surface sample issues: If the air sample or surface sample issue or potential contamination arises during the sampling session or the transition state toward the sampling session, discard the sample and take another sample in accordance with the protocol.
- Protocol procedure not being followed during EM session: If the sampling time exceeded the maximum exposed time, such as a settle plate exceeding four hours, write a deviation in the EM protocol and take another sample.
Setting Up Viable Air Monitoring Equipment
Set up the equipment in the locations specified in Figure 2. Perform this test in both static and dynamic conditions.
Setting Up Non-Viable Air Monitoring Equipment
Set up the equipment in locations specified in Figure 3. Perform this test in both static and dynamic conditions.
Setting Up Viable Surface Agar Plates
Sample the plates in the locations specified in Figure 4. Set up your viable surface monitoring starting at the highest point in a room/area and completing with the lowest surface (e.g., tanks/wall/doors before platforms/floors). When performing viable surface monitoring, ensure no other sampling equipment is within the vicinity of the room to avoid potential interference or invalid results based on the intent of the test. Each saturated wipe should be used only once per location with respect to all viable surface monitoring samples and then discarded. Perform this test in both static and dynamic conditions.
The final article of this series will discuss Phase 4: Sampling Laboratory, Phase 5: Sample Analysis, and Phase 6: Sampling Conclusion.
Note: A version of this article will appear in an upcoming revision of the book Environmental Monitoring: A Comprehensive Handbook, to be published by the PDA/DHI (Parenteral Drug Association / Davis Healthcare).
About The Author:
 Allan Marinelli acquired over 25 years of worldwide cGMP experience in Belgium, France, South Korea, China, India, Canada, and the U.S. under the FDA, EMA, SFDA, KFDA, WHO, and other regulators. He is currently the president/CEO of Quality Validation 360 Inc., providing consultation services to the (bio)pharmaceutical, medical device, vaccine, and food/beverage industries. Marinelli has authored peer-reviewed papers (Institute of Validation Technology) and chapters on validation, risk analysis, and environmental monitoring in PDA/DHI books, and chapters on cleaning validation in PDA/DHI books. In addition, Marinelli published peer-reviewed articles on Pharmaceutical Online, Bioprocess Online, and Outsourced Pharma in 2016, 2017, and 2018. He is an associate member of ASQ (American Society for Quality) and published an article in ASQ titled “Against the Grain, Standing your ground when senior majority rules” in Quality Digest (Aug. 2014). You can contact him at amarinelli360@gmail.com