
Installing and Aligning A New Mercury Bulb
Source: Carl Zeiss, Inc., IMT Corp., Industrial Metrology
Carl Zeiss, Inc., IMT Corp., Industrial Metrologyl>
![]()
ADDENDUM TO MERCURY/XENON LAMP EXCHANGE/ALIGNMENT
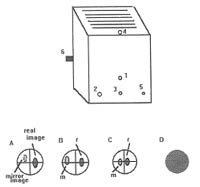
1. Mirror adjustment up & down.
2. Mirror adjustment left & right.
3. Focussing of mirror image only.
4. Real image adjustment up & down.
5. Real Stage adjustment left & right.
6. Collector Lens Adjustment which focuses
simultaneously the real and mirror image.
- Remove the old lamp by following instructions
outlined in the main illuminator manual on pages 4 and 5. Remember never touch the
bulb with your hands! (If you do touch the bulb, gently wipe off with 100% EtOH).
Remember, when you replace the bulb back into the socket, try to line up the heat sinc so that it is parallel to the front of the socket. Because the lamp housing is in a small space, it will be easier to position the socket into the housing, if the heat sinc is lined up!
- After you have replaced the arc lamp, turn on the power, open the shutter and take off the nosepiece dust caps or remove an objective from the nosepiece to allow the fluorescence light to be projected down to the stage area. Place a white piece of paper on the stage and move the 3FL to the position which is the most dim.
- Adjust the black collector focusing control (6) so that the real and mirror images are at their smallest size which will be their most focused. Remember that when you install a new bulb the first adjustment that usually needs to be checked is the real image up and down control (4). Adjust the up and down control of the real image until both the real and mirror images are visible in the field (A).
- Adjust the focus/size of the mirror image (3) so that the real and mirror image are at the same focus/size as shown in (B).
- Adjust the real image position using again (4) and (5) so that the real image is centered up and down and is just to the side of center!
- Once the REAL image is positioned, move the MIRROR image using left and right controls (2) and up and down controls (1) so that the mirror image is centered up and down and on the opposite side of center from the REAL image. Remember that although the REAL image controls move both the real and mirror images, the mirror image controls move only the mirror image.
- Finally, by using the collector lens focusing control (6. defocus/spread the beam to achieve the most evenly illuminated field as shown in D. The final spreading of the beam is easiest checked on a H & E or an actual fluorescent specimen.
- FINAL NOTE: A newly installed bulb should burn for at least 2 hours before being turned off. Always remember, the total lifetime of a bulb is a product of the total hours on the bulb as well as the # of times it has been turned on and off. Hence, be conscious of the future use of the bulb during the course of a day, before you make the decision to turn the bulb off. If the bulb has been turned off and you realize that you need it again, you should wait for 20 minutes before turning it back on again.
Microscope Division
Carl Zeiss, Inc.
One Zeiss Drive
Thornwood, NY 10594
Call: 800-233-2343
Fax: 914-681-7446
<%=company%>
This website uses cookies to ensure you get the best experience on our website. Learn more